Serverless Deployment with Google Gemma using Beam Cloud
Deploy Google Gemma 2B on Beam Cloud using FastAPI for serverless inference. This guide covers model setup, Hugging Face token authentication, autoscaling, and seamless deployment. Learn how Beam Cloud simplifies LLM hosting with scalable infrastructure.

In our previous blog, we showed you how to deploy a Large Language Model like Mistral 7B going serverless using Modal Labs. Today's blog explores Beam Cloud which provides similar services. We'll demonstrate how to deploy the Google Gemma 2B model with HuggingFace and Beam Cloud. If you're unfamiliar with the concept of serverless deployment, we recommend checking out our previous blog for a detailed explanation. All the code files are available on this GitHub repository.
☁️ Beam Cloud
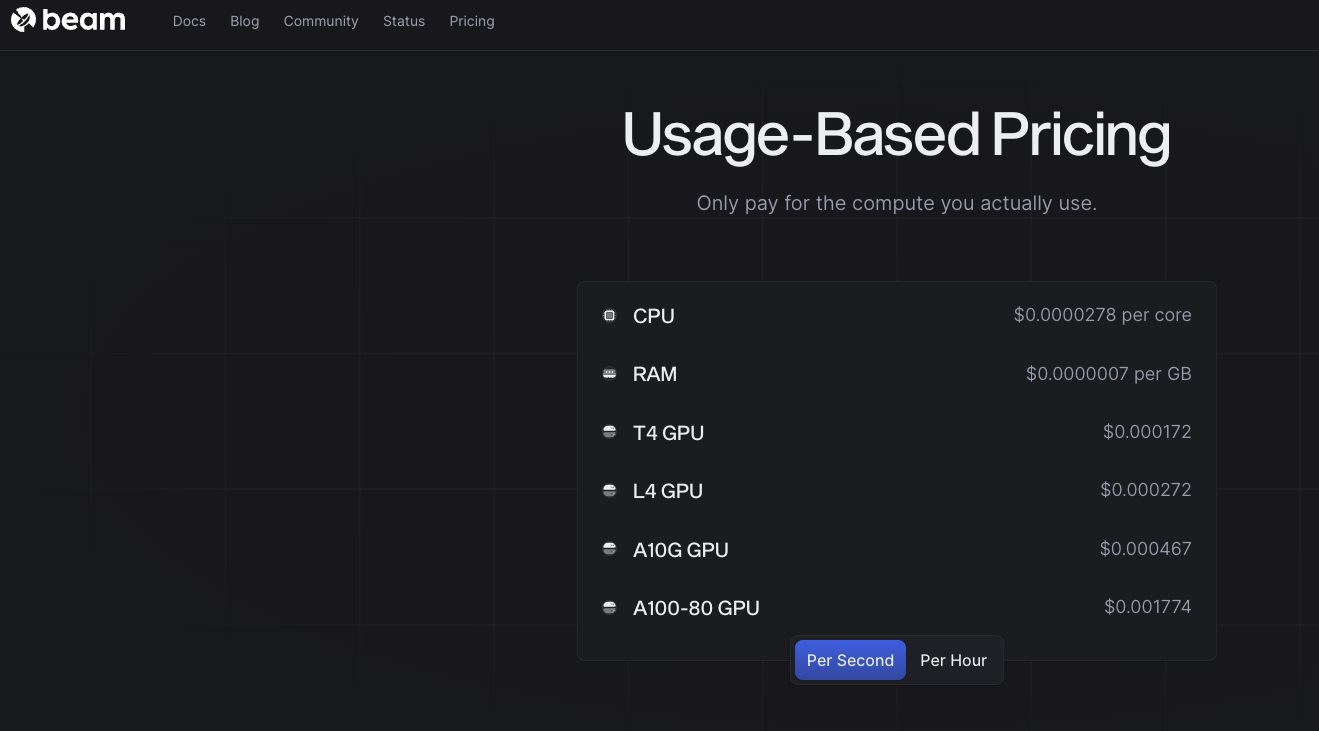
Beam Cloud provides serverless infrastructure for deploying Machine Learning models. They specialize in deploying LLMs for inference and fine-tuning, along with similar capabilities for diffusion models. Here is the pricing for Beam Cloud:
Beam's functionality is similar to Modal in some ways. It provides an interface abstracting out the docker file and deployment process. In this example, we'll demonstrate how to develop a custom Beam deployment using FastAPI under the hood. It's important to note that Beam is a relatively new player in the serverless market (as of this writing), and its documentation may not be as extensive as established solutions. However, let's dive right in and explore the process!
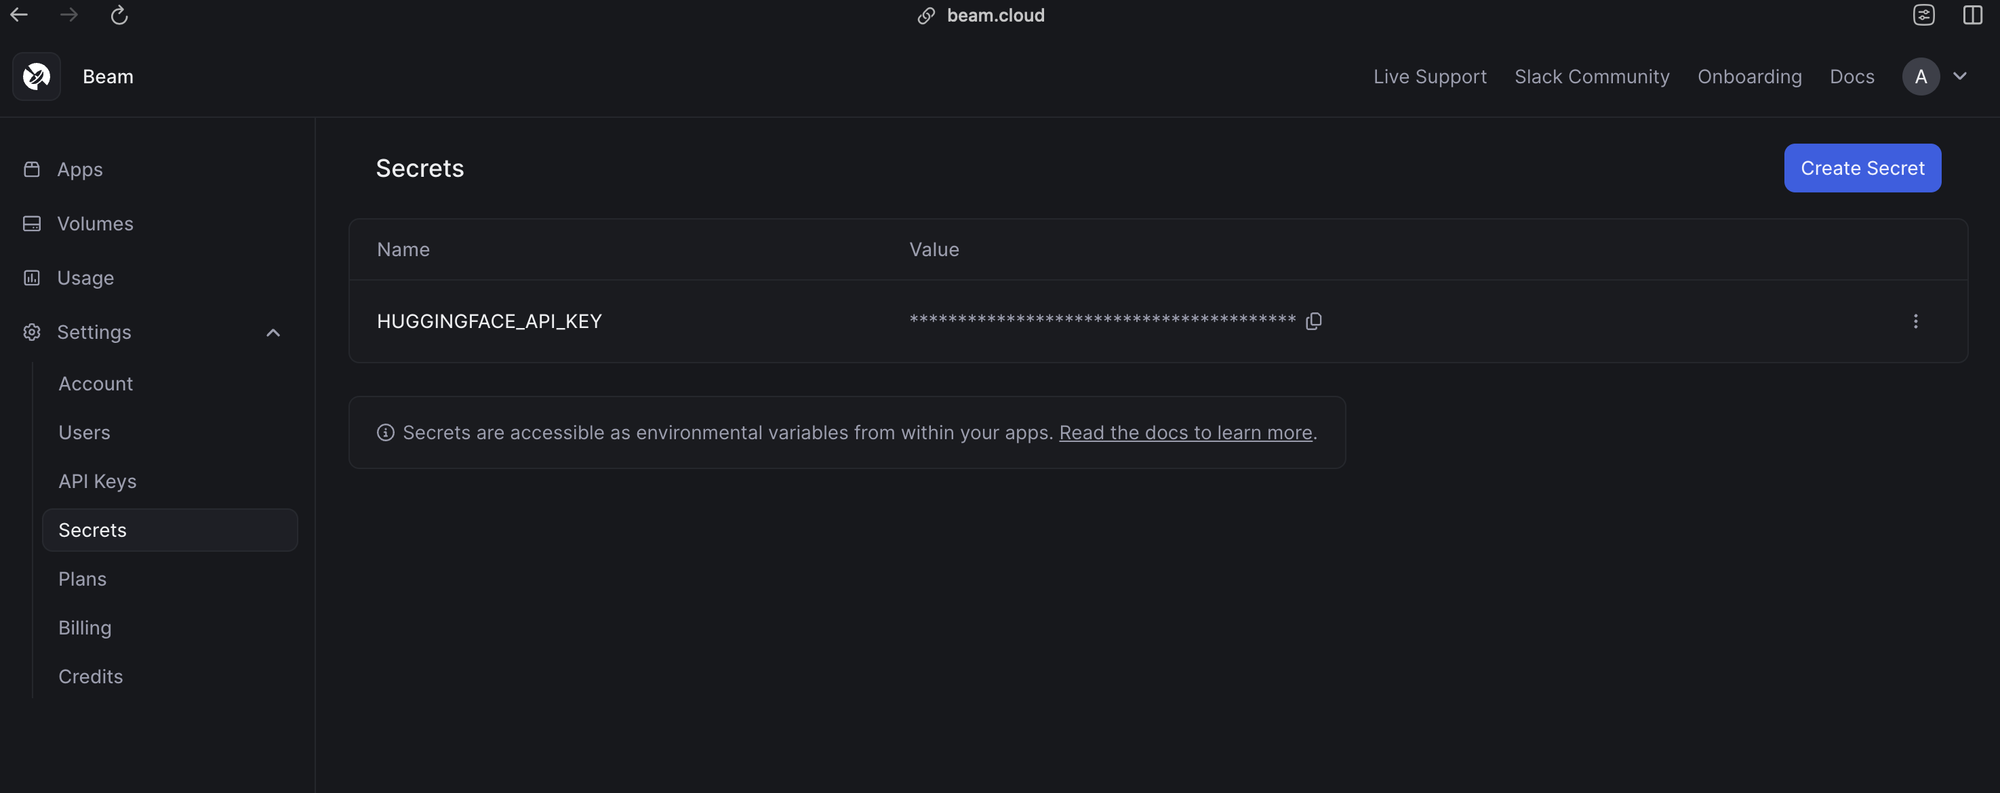
🔐 Register your HF Access token to Beam
Before diving into the code, it's important to consider how gated models are handled. If you plan to use a gated model like Gemma 2B, you'll need to obtain access first.
Here's a breakdown of the steps:
- Authorization through Hugging Face: Head over to your Hugging Face account and authorize access to the desired gated model (e.g., Gemma 2B).
- Downloading with Token: When using the Hugging Face Python library to download the model, include your access token as an argument. This prevents errors that might occur without proper authorization. You can learn more about how to use gated model using huggingface documentation.
Beam Cloud itself doesn't require separate access management for gated models. However, you'll still need to use the access token you obtained from Hugging Face during the download process.
Here's how to handle the token within your Beam Cloud deployment:
- Create a Secret: Navigate to the Settings > Secrets tab in your Beam Cloud dashboard. Create a new secret specifically for storing your Hugging Face access token.
- Access as Environment Variable: Beam Cloud automatically sets your created secret as an environment variable within your deployment environment. You can then retrieve the token using the
os.environ.get()method in your code, allowing you to access the gated model during deployment.
By following these steps, you can ensure proper access and utilization of gated models within your Beam Cloud deployments.
Now that we've addressed gated models, let's begin building our server. Here's the file structure we'll be using for this deployment:
deploy_beam
├── constants.py         # Define different constants and config
├── requirements.txt     # Dependencies which will be installed while setting up the server
└── server.py            # Define the REST endpoint with your huggingface engine inference
In the following sections, we will define each component one by one.

🕹️ Define the constants and configs
Within constants.py file, we define all the default configurations used in setting up the server. Here is how we define them:
NAME = "beam-stable-lm-3b-deployement-a10g"
CPU = 4
GPU = "A10G"
PACKAGES = [
    "huggingface_hub==0.19.4",
    "hf-transfer==0.1.4",
    "torch==2.1.2",
    "transformers",
    "datasets",
    "accelerate",
    "fastapi",
]
PYTHON_VERSION = "python3.9"
CACHE_PATH = "./cached_models"
MODEL_ID = "google/gemma-2b-it"
It's important to note that in the same file you can load a wide range of HuggingFace modesl. Simply swap out the Gemma Model with any other model ID from HuggingFace. For example, to deploy Mistral 7B Instruct model, you'd change BASE_MODEL to mistralai/Mistral-7B-Instruct-v0.1.
Now let's define our server file. Note that for loading bigger models you might require bigger GPUs like A100. On Beam this is not readily available. You'd need to put in a request for A100 in order to get access and deploy on those machines.
💾 Defining our server
We'll break this deployment process into three key parts:
- Server Setup: We'll define the container image and its configuration requirements.
- Inference Engine and API: We'll create a Hugging Face inference engine and build a FastAPI server for handling requests.
- Beam Cloud Deployment: We'll explore how to deploy the model on Beam Cloud.
Before diving in, let's import the essential modules we'll be using throughout this process:
import os
import json
import asyncio
from queue import Empty
from threading import Thread
from fastapi import FastAPI
from fastapi.responses import StreamingResponse
from typing import AsyncGenerator
from fastapi import Request
from beam import App, Runtime, Image, Volume, RequestLatencyAutoscaler
from transformers import AutoTokenizer, AutoModelForCausalLM, TextIteratorStreamer,

# Import from constants
from constants import (
    NAME,
    CPU,
    GPU,
    PYTHON_VERSION,
    PACKAGES,
    CACHE_PATH,
    MODEL_ID,
)
Let's get started!
Setting up
We start by creating and defining our application app image. We will use this to build our app container image with our specified config. Here is how we do it:
app = App(
    name=NAME,
    runtime=Runtime(
        cpu=CPU,
        gpu=GPU,
        image=Image(python_version=PYTHON_VERSION, python_packages=PACKAGES),
    ),
    # Storage Volume for model weights
    volumes=[Volume(name="cached_models", path=CACHE_PATH)],
)

# Autoscale by request latency
autoscaler = RequestLatencyAutoscaler(desired_latency=30, max_replicas=5)
Based on this documentation, we define a pre-loading function which we define to run exactly once when the container first starts. For this example this will be our download model function. Here is how we do that.
def load_models():
    # this is a one time function which beam uses when the server starts for the
    # very first time. After that, it loads the model from cache dir

    model = AutoModelForCausalLM.from_pretrained(
        MODEL_ID, cache_dir=CACHE_PATH, device_map="auto", token=os.environ.get("HUGGINGFACE_API_KEY")
    )
    tokenizer = AutoTokenizer.from_pretrained(MODEL_ID, cache_dir=CACHE_PATH, token=os.environ.get("HUGGINGFACE_API_KEY"))

    streamer = TextIteratorStreamer(tokenizer=tokenizer)
    return model, tokenizer, streamer
Write the FastAPI server which will do HF Model inference
Now we can finally define our web server, which is a FastAPI app defined by Beam's decorator:
@app.asgi(workers=2, authorized=False, loader=load_models)
def web_server(**inputs):
    app_server = FastAPI()

    async def _stream(
        chat_input: str, generation_kwargs: dict
    ) -> AsyncGenerator[str, None]:
        model, tokenizer, streamer = inputs["context"]
        if isinstance(chat_input, str):
            chat_input = [{"role": "user", "content": chat_input}]

        input_ids = tokenizer.apply_chat_template(
            conversation=chat_input, tokenize=True, return_tensors="pt"
        ).to("cuda")

        gen_kwargs = dict(
            input_ids=input_ids, streamer=streamer, **generation_kwargs
        )
        thread = Thread(target=model.generate, kwargs=gen_kwargs)
        thread.start()

        for chunk in streamer:
            try:
                if chunk is not None:
                    print(chunk)
                    yield chunk
            except Empty:
                await asyncio.sleep(0.001)

    @app_server.post("/stream")
    async def stream_response(request: Request):
        data = await request.json()
        prompt = data.get("messages", "")
        generation_kwargs = dict(
            max_new_tokens=int(data.get("max_new_tokens", 512)),
            temperature=float(data.get("temperature", 0.1)),
            top_p=float(data.get("top_p", 0.95)),
        )

        async def stream_gen():
            async for chunk in _stream(
                chat_input=prompt, generation_kwargs=generation_kwargs
            ):
                yield f"data: {json.dumps(dict(text=chunk), ensure_ascii=False)}\n\n"
        return StreamingResponse(stream_gen(), media_type="text/event-stream")

    return app_server
While more complex deployments might benefit from a dedicated inference engine, but just to make this simple, we are using it inside the server itself. This approach simplifies the setup for this example.
Now, it's time to deploy our LLM into Beam Cloud. We will be using Beam CLI for this. Installing Beam SDK is super easy. Just follow along with these commands:
# Install the main beam SDK

curl https://raw.githubusercontent.com/slai-labs/get-beam/main/get-beam.sh -sSfL | sh

# After this install the python sdk

python3 -m pip install --upgrade beam-sdk
Once done, make sure you have an account on Beam. You can use this repo or customize it according to your needs. In order to run, all you have to do is:
beam serve server.py

# or
beam deploy server.py
This will serve/deploy your HuggingFace Model. Once served/deployed, it will open a separate browser window, showing you the deployment with all the metrics and essential post deployment KPIs. This is what it looks like after deployment:

beam serve we can see the build process all from the terminal and files are temporarily sent to Beam Cloud. This makes the deployment temporary. It helps when you have written your code initially and want to test. In deploy you send all your files to Beam Cloud and let it manage from there. After this, you can manage (like watching logs / deleting app) using Beams' python CLI or inside their app.Copy the deployed link. This will be required when we put requests to our deployed applications.
🤖 Getting a response from your deployed model
Congratulations! You've made it through the core setup. Now for the easy part. We created a simple REST API server with streaming enabled. Here is how to write a simple function to stream the responses. Remember, in the last section we mentioned to copy the deployed link. Now in the url parameter you need to append /stream otherwise it won't be routed to do streaming. See our example below:
import requests
import json

url = "https://fpi3j-65fc6c6bf344f40007ddce23.apps.beam.cloud/stream"
payload = {
    "messages": "hello this is a test",
    "temperature": 0.1,
    "top_p": 0.7,
    "max_new_tokens": 512,
}

headers = {
    "Accept": "*/*",
    "Accept-Encoding": "gzip, deflate",
    "Authorization": "Basic <YOUR-BEAM-API-KEY>",
    "Connection": "keep-alive",
    "Content-Type": "application/json",
}

response = requests.request(
    "POST", url, headers=headers, data=json.dumps(payload), stream=True
)


full_response = ""

for text in response.iter_lines():
    decoded_string = text.decode("utf-8")
    json_string = decoded_string.split(":", 1)[0].strip()
    data_dict = json.loads(json_string)
    extracted_text = data_dict["text"]
    full_response += extracted_text

    # just to see the streaming
    print("text: ", extracted_text)


print(full_response)
🌀 Conclusion
This tutorial has equipped you with the knowledge to deploy a wide range of HuggingFace transformer models using Beam Cloud fully serverless. We've covered the entire process, along with some best practices.
While Beam is still in its early stages when it comes to functionalities, degree of freedom and support, we're optimistic about its future.
In the next installments of this series, we'll demonstrate how to achieve the same outcome with Runpod. We'll then delve into a comprehensive comparison of Beam Cloud and Runpod, highlighting their unique strengths and trade-offs for various deployment scenarios.
Stay tuned for more updates.