Serverless Deployment of Mistral 7B with Modal Labs and HuggingFace
Most of our blogs primarily delve deep into research topics. From Mixture of Experts, synthetic datasets, and Model merging to LLM Evaluations, our blog covers it all. This post is a bit different and includes a more hands-on approach to how we can deploy Large Language Models going fully serverless. In this blog, we are going to use Modal Labs to deploy Mistral-7B-instruct by Mistral AI. All the code files are available on this GitHub repository.
🤔 What does serverless deployment mean?
Serverless deployment is essentially a method of deploying applications where you're charged for infrastructure based on computational usage rather than a fixed amount of bandwidth or a set number of servers. With serverless computing, a cloud provider manages the provisioning, maintenance, and scaling of server infrastructure, allowing developers to focus solely on packaging their application code logic using APIs and deploying it.
Serverless deployment proves highly beneficial when dealing with inconsistent usage patterns. For instance, consider deploying a Large Language Model (LLM) for inference tasks. If you deploy an LLM like Llama 2 7B on AWS, you'll be charged based on the compute resources used and the uptime of your server, regardless of actual usage. However, with serverless deployment, your server operates only when it receives requests. Consequently, the uptime becomes dynamic, resulting in significant cost savings.
Nevertheless, serverless deployment does have one significant drawback: when your server goes idle, reactivating it can incur a delay, known as a cold start. The duration of this delay depends on the optimizations made by the service providers. We'll delve into this issue further in subsequent discussions.
🔍 Outcomes of this tutorial
Before proceeding further, it is crucial to grasp the outcomes of this hands-on tutorial. Upon completion, one can effortlessly deploy LLMs/SLMs using Modal with an added level of customization. While deployments on vLLM were considered, it appears that vLLM's output is either incomplete or insufficient due to its optimizations (based on this issue). That is why we are going to deploy using simple PyTorch-based HuggingFace Transformers.
🧪 Modal Labs
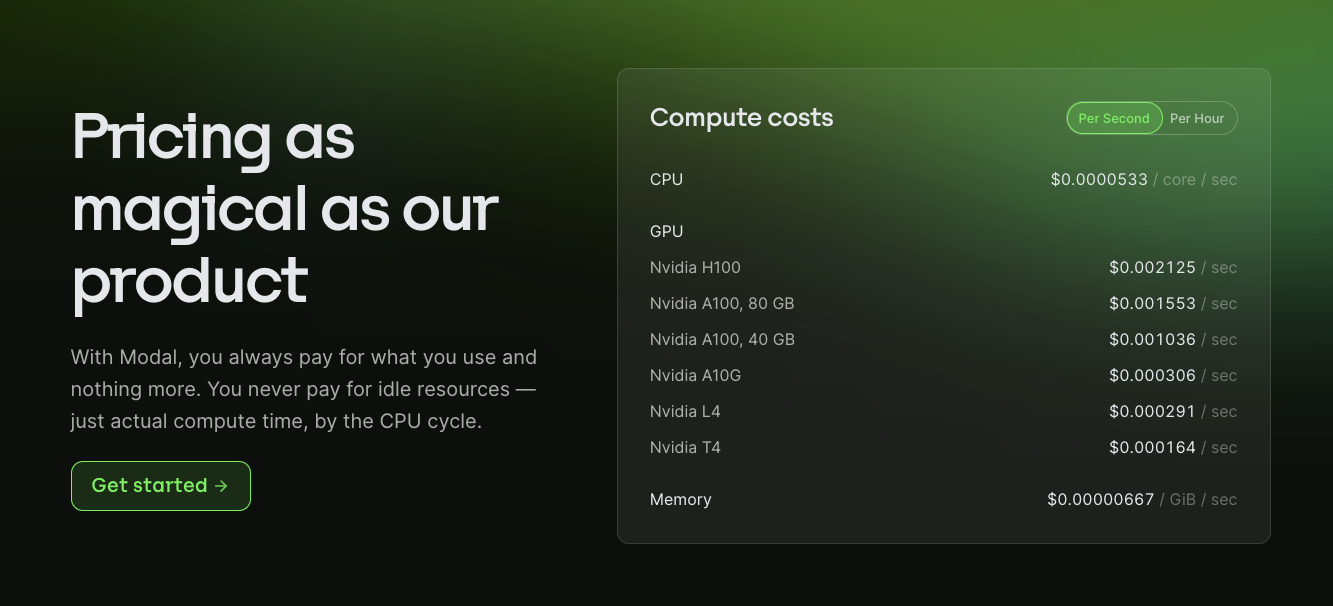
Modal Labs provides dedicated GPU and infrastructure mainly focused on doing serverless deployments of models. Some of its key features include providing serverless deployments for LLMs and image models, fine-tuning LLMs, etc. Here is the pricing of Modal Labs.
An awesome thing about Modal is that you do not have to do the heaving lifting to do the MLOps side of things for deploying models on Modal. Modal provides a nice Python interface to handle those. Without further do, let's begin deploying our models using Modal. This is how we define our folder structure for this project:
deploy-modal
├── constants.py        # Define different constants and config
├── engine.py           # Define the main inference engine and stub here
├── requirements.txt    # Dependencies which will be installed while setting up the server
└── server.py           # Define the REST endpoint here
Another concept that we need to understand is the concept of Modal Stub. According to Modal's documentation, the concept of Modal Stub describes essential components that characterize Modal objects such as Functions, Images, and Secrets within an application. These stubs serve three primary functions:
- Syncing of identities across processes (your local Python interpreter and every Modal worker active in your application).
- Ensuring that objects remain alive and are not garbage collected for as long as the app runs.
- Manage log collection for everything that happens inside your code.
Now we are ready to define each of the files one by one and to deploy our models.
🔮 Defining our constants
In the constants.py file, we define all the default configurations which will be used while setting up the server. Here is how we define them:
# Define the model name and model dir
MODEL_DIR = "/model"
BASE_MODEL="mistralai/Mistral-7B-Instruct-v0.1"


# Name the stub (it should all be in lower case)
STUB_NAME=f"{BASE_MODEL.lower()}-deployement"

### Server level default configs
# Keep warm: is the warm pool size or the minimum number of containers that will always be up for your serverless function to get executed (Modal will scale up more containers from there based on need or demand)

KEEP_WARM = 1

# num of concurrent requests: is the number of concurrent requests a container should handle
NUM_CONCURRENT_REQUESTS = 10

# timeout: This is the server timeout after which it would be shutdown the server.
TIMEOUT = 600

# Number of GPUs to use
GPU_COUNT = 1
Please note, by using the same file you can deploy almost any HuggingFace model. All you need to do is replace the mistral Model to any other model id from HuggingFace. For example, if we want to deploy Stable LM Zephyr 3B model, then we are just going to change the BASE_MODEL to stabilityai/stablelm-zephyr-3b. Now let's define our inference engine file.
🤗 Defining our HuggingFace Engine file
In this section, we will gradually construct the engine file and define the Modal Stub with appropriate GPU configurations. Typically, when deploying models serverlessly, they operate within a Docker container. These Docker containers utilize the GPUs supplied by the VMs. So, we need to first define a GPU_CONFIG which we will be using throughout for running models or modal functions. A GPU_CONFIG determines what kind of GPU we want to use, how many GPUs we want to use, the GPU memory, etc. Here is how we define our GPU memory inside Modal:
# First import all the necessary packages and modules

import os
import asyncio
from queue import Empty
from typing import List, Union, List

# Import modal's required imports
from modal import Image, Stub, gpu, method, enter, exit

# Import the constants defined in constants.py
from constants import (
    MODEL_DIR,
    BASE_MODEL,
    STUB_NAME,
    NUM_CONCURRENT_REQUESTS,
    TIMEOUT,
    GPU_COUNT
)

# Define our GPU Config

if BASE_MODEL == "mistralai/Mistral-7B-Instruct-v0.1":
    GPU_CONFIG = gpu.A100(count=GPU_COUNT, memory=80)
else:
    GPU_CONFIG = gpu.Any(count=GPU_COUNT)
We are using an additional if-else statement to show you, we can logically or even provide rules to which GPU to use while provisioning. For instance, models like Stable LM 3B or Gemma 2B from Google are simply models with <= 3B parameters, its size is much smaller than Mistral 7B. Hence, we are implementing an additional check: if our BASE_MODEL is a Mistral Model then we are going to use A100-80 GB GPU, otherwise we are going to use gpu.Any by Modal which dynamically switches between Nvidia L4 and A10G based on the availability. You can learn more about Modal GPUs here. After this, let's set up our Modal stub here. Setting up a stub requires just one line of code:
stub = Stub(name=STUB_NAME)Define functions which will run only once during server setup
Now, we will define functions that run only once during our initial server setup. After this setup, the outputs will be cached and utilized in subsequent runs. In our scenario, this involves downloading the model and saving it under a specified directory. Here's a preview of how it appears:
def download_model_to_folder():
    from huggingface_hub import snapshot_download
    from transformers.utils import move_cache

    os.makedirs(MODEL_DIR, exist_ok=True)

    snapshot_download(
        BASE_MODEL,
        local_dir=MODEL_DIR,
        ignore_patterns=["*.pt"],  # Using safetensors
    )
move_cache()Define the container Image
Every model deployment runs inside a Docker container. Therefore, an essential step in model deployment is to define our Dockerfiles. Writing Dockerfiles becomes incredibly easy using Modal. It offers a Python interface to write the Dockerfile and allows us to provide only the essential configurations required during the server setup, while Modal handles everything else. Here's how we define our image in this example:
HF_DOCKER_IMAGE = (
    Image.from_registry("nvidia/cuda:12.1.0-base-ubuntu22.04", add_python="3.10").pip_install_from_requirements("./requirements.txt")
    .env({"HF_HUB_ENABLE_HF_TRANSFER": "1"})
    .run_function(download_model_to_folder)
)
The above code block attempts to achieve the following:
- Use a base docker image which in our case is
nvidia/cuda:12.1.0-base-ubuntu22.04. This will contain all the Nvidia Cuda drivers pre-installed and use the python version to be3.10 - After this, copy the
requirements.txtfile from the host to their volumes and then use it to install all the additional dependencies specified by the user. - Finally, set up all the environment variables needed and download the
download_model_to_folderfunction to download the model to save it to a cache directory.
Awesome, now the last thing left is to write out our inference engine.
Writing our HuggingFace Inference engine
We are going to define a HFEngine class wrapped under @stub.cls decorator which will manage and extend this class to run under the aforementioned docker image, handle concurrent requests, maximum timeouts etc. HFEngine class will have three methods, each wrapped under a specific Modal's decorator. These methods are as follows:
start_enginewrapped with Modal's decorator@entrywhich is the function that will run only once when the server is starting. In this case, loading the model from cache.terminate_enginewrapped with Modal's decorator@exitwhich is the function that will run once the server is terminated. In this case, unloading the model weights from GPU.streamwrapped with Modal's decorator@methodwhich is the main function that will be used to run the main logic whenever a requests comes. Here we write our main inference code.
Now that we have understood each of the methods and their needs, here is how we define our HFEngine class:
@stub.cls(
    gpu=GPU_CONFIG,
    timeout=TIMEOUT,
    container_idle_timeout=TIMEOUT,
    allow_concurrent_inputs=NUM_CONCURRENT_REQUESTS,
    image=HF_DOCKER_IMAGE,
)
class HFEngine:
    model_name_or_path: str = MODEL_DIR
    device: str = "cuda"

    @enter()
    def start_engine(self):
        from transformers import AutoModelForCausalLM, AutoTokenizer, TextIteratorStreamer

        self.model = AutoModelForCausalLM.from_pretrained(self.model_name_or_path, trust_remote_code=True).to(self.device)
        self.tokenizer = AutoTokenizer.from_pretrained(self.model_name_or_path, trust_remote_code=True)
        self.streamer = TextIteratorStreamer(self.tokenizer)
        return self

    @exit()
    def terminate_engine(self):
        import gc
        import torch

        del self.model
        torch.cuda.synchronize()
        gc.collect()

    @method()
    async def stream(self, chat_input: Union[str, List[dict]], generation_kwargs: dict):
        from threading import Thread

        if isinstance(chat_input, str):
            chat_input = [{"role": "user", "content": chat_input}]
        input_ids = self.tokenizer.apply_chat_template(
            conversation=chat_input, tokenize=True, return_tensors="pt"
        ).to(self.device)

        gen_kwargs = dict(
            input_ids=input_ids,
            streamer=self.streamer,
            pad_token_id=self.tokenizer.eos_token_id,
            **generation_kwargs
        )

        thread = Thread(target=self.model.generate, kwargs=gen_kwargs)
        thread.start()

        for next_token in self.streamer:
            try:
                if next_token is not None:
                    yield next_token
            except Empty:
                await asyncio.sleep(0.001)
Great progress so far. We're nearly finished. We have now defined our HuggingFace Engine along with all the necessary constants. The last step remaining is to define our REST API Server using Modal.
🎮 Define the API Server
This is the last step, where we are going to define our API server. We start off by importing all our necessary packages and modules like this:
import json
from typing import Union, List
from pydantic import BaseModel, Field
from fastapi.responses import StreamingResponse
from modal import web_endpoint

# Define the required things for building the server
from engine import stub, HFEngine, HF_DOCKER_IMAGE
from constants import KEEP_WARM, NUM_CONCURRENT_REQUESTS, TIMEOUT
As you can see, we also imported our stub, since this stub will help us to manage modal's components w.r.t. the demanded infra. After this we define a JobInput class. This is a pydantic model which helps to ensure the schema of request input remains fixed and unchanged. We can also incorporate more server level best practices, but that is out of the scope of this blog. This is also compatible with FastAPI, and this means it can support and extend lots of FastAPI based methods too. In our case, we are using StreamingResponse class from FastAPI for enabling streaming of responses:
class JobInput(BaseModel):
    messages: Union[str, List[dict]]
    max_new_tokens: int | None = Field(default=512)
    temperature: float | None = Field(default=0.7)
    top_p: float | None = Field(default=0.95)
In Modal, our endpoint is treated as a Modal function. We use @web_endpoint decorator where we define whether it is a GET/POST request and we also define a label which will be used in the exposed url. Here is how we define that in just a few lines of code:
@stub.function(
    keep_warm=KEEP_WARM,
    allow_concurrent_inputs=NUM_CONCURRENT_REQUESTS,
    timeout=TIMEOUT,
    image=HF_DOCKER_IMAGE
)
@web_endpoint(method="POST", label="completion")
async def completion(item: JobInput):
    model = HFEngine()
    gen_kwargs = {
        "max_new_tokens": item.max_new_tokens,
        "temperature": item.temperature,
        "top_p": item.top_p,
        "do_sample": True
    }

    async def _stream_completion():
        async for text in model.stream.remote_gen.aio(
            chat_input=item.messages, generation_kwargs=gen_kwargs
        ):
            yield f"data: {json.dumps(dict(text=text), ensure_ascii=False)}\n\n"

    return StreamingResponse(_stream_completion(), media_type="text/event-stream")
And voila, we have defined our REST API Endpoint which will serve our model of choice. Now it's time to deploy our server. To do that, you should have a Modal account. In just one line of command you can now deploy this server. Here is how you can do it:
modal serve server.pyModal offers two types of commands: modal serve or modal run . With these commands, you can observe the build process directly from your terminal, and your files are temporarily sent to Modal. This makes the deployment temporary, which is helpful during initial code writing and testing phases. Once iterations over the code are complete, we use modal deploy which makes a permanent deployment managed fully by Modal. You can then delete the apps either through the modal CLI or their platform.
🌀 Conclusion
In this tutorial, we've explored how to deploy nearly any HuggingFace transformer model using Modal Labs fully serverless. We've covered the entire procedure along with some best practices. Modal offers numerous excellent examples in their documentation. If you wish to check and run the code from this tutorial, you can head over to the corresponding repository.
In the upcoming blogs of this series, we'll demonstrate how to achieve the same outcome with two more serverless providers: Beam Cloud, and Runpod. Additionally, we'll analyse how they compare with each other and discuss their tradeoffs on certain parameters. So, stay tuned for more updates.