Serverless Deployment of Mistral 7B v0.2 using Runpod

Welcome to our third series of serverless LLM deployments. In our first blog, we explored Modal Labs and deployed Mistral 7B serverless. We did the same with Google Gemma in our second blog with Beam cloud. In this blog, we are going to deploy the latest Mistral 7B v0.2 by Mistral AI using RunPod. If you're unfamiliar with the concept of serverless deployment, we recommend checking out our previous blog for a detailed explanation. All the code files are available on this GitHub repository.
🧊 RunPod
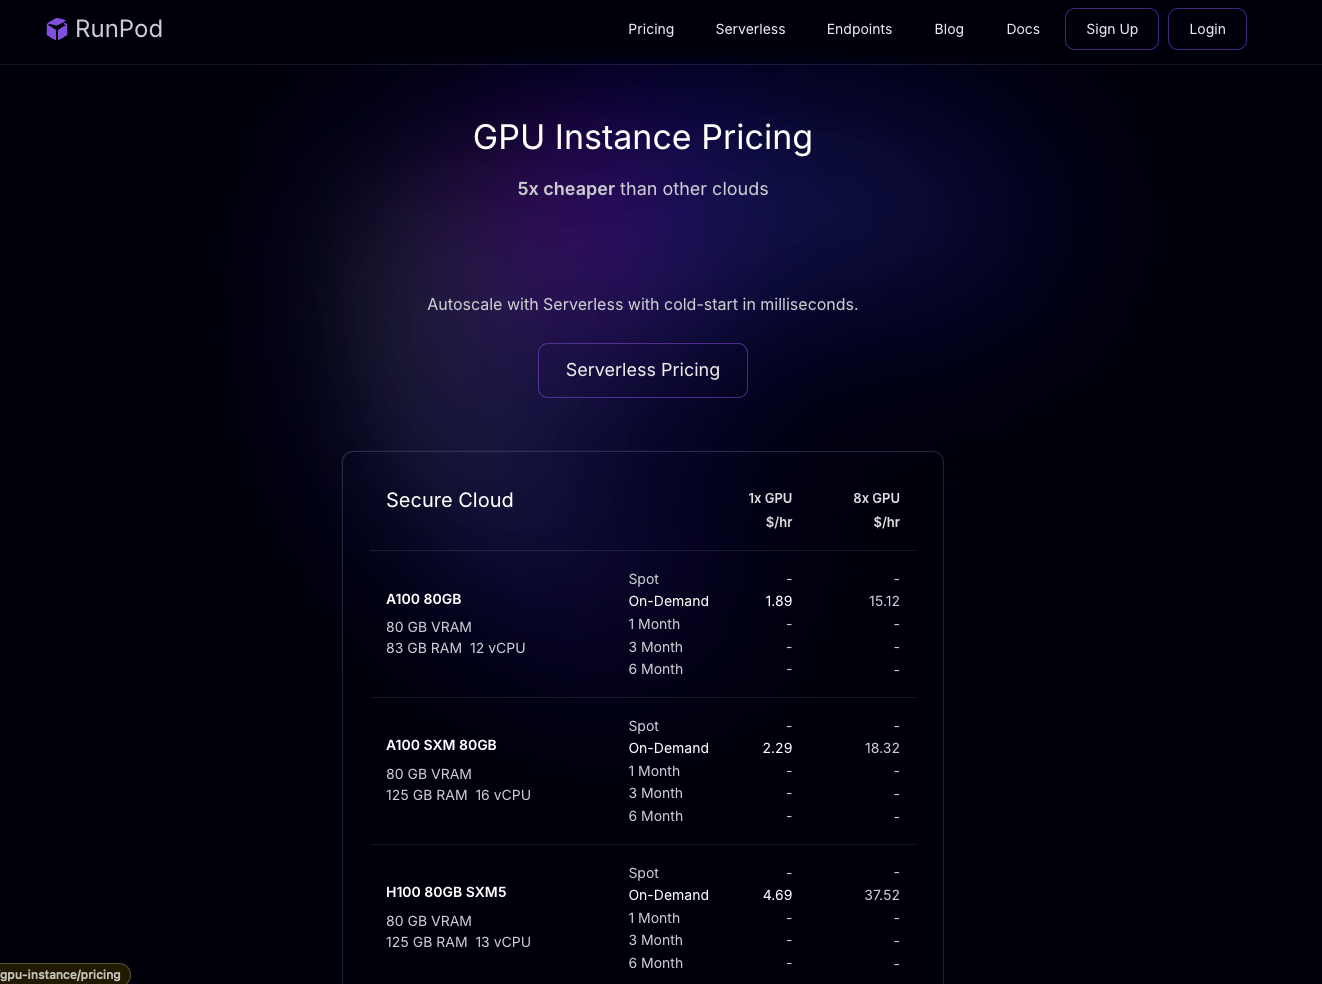
RunPod is a distributed GPU cloud infrastructure built for production. It enables efficient development, training, and scaling of AI applications, and also helps to manage deployments. You can rent different GPUs using RunPod at competitive rates to carry out your experiments, or use their serverless deployment services to deploy AI based applications. Here is the pricing of RunPod:
The deployment workflow of RunPod differs significantly from Modal and Beam. Unlike their high-level Python APIs that abstract away much of the deployment process, RunPod requires you to provide a Docker image. This means that we need to write almost everything from scratch, which gives a huge degree of freedom when it comes to customization. Before we begin, ensure that you are signed in to RunPod. Now, let's define the file structure for this project:
deploy_runpod
├── Dockerfile                   # Dockerfile to write the instruction to package your deployment code
├── requirements.txt             # A requirements file to install the depdencies
├── scripts
│   └── download_hf_model.py     # A python script to download model from huggingface
└── src
    ├── constants.py             # Defining all the server level default configs and constants
    ├── engine.py                # Defining the HuggingFace Inference Engine
    └── handler.py               # This will contain a handler function which will be the entrypoint for runpod to server and manage deployments.
Additionally, we could leverage a .github/ folder to define our CI/CD workflow YAML configs to make the full continuous model build and deployment running. However, this is beyond the scope of this tutorial.
Now, let's define each component one by one.
📝 Setup scripts for very first deployment
We start by writing simple scripts that we'll run only once during our server deployment. A script can be a simple Python script (like ours in this example) or a bunch of Bash scripts too, depending upon how complex your workflow is. For example, if you are dealing with TensorRT or Triton Inference Server, you might have to write some extra Bash script for setting up things. However, those are out of the scope of this blog post. In our blog post, we define a simple script to download the model from HuggingFace and store it inside a cache dir. Here's how:
import os
from huggingface_hub import snapshot_download

def download_model_to_folder(model_id: str, model_dir: str):
    os.makedirs(model_dir, exist_ok=True)
    snapshot_download(
        model_id,
        local_dir=model_dir,
        ignore_patterns=["*.pt"],  # Using safetensors
    )
We'll use these scripts later when we spin our deployed docker container.
🕹️Writing out the main code logic
In this section, we'll focus on the key components within the src directory. We'll start by defining constants, followed by a custom HuggingFace Inference engine. Finally, we'll write a small handler function using RunPod's Python library to manage our deployments. Let's start with writing our constant configs:
Define constant configs
Within src/constants.py file, we define all the default configurations used in setting up the server. Here is how we define them:
DEFAULT_MODEL_DIR = "/model"
DEFAULT_DEVICE="cuda"
DEFAULT_MODEL_NAME="mistralai/Mistral-7B-Instruct-v0.2"
DEFAULT_TOKENIZER_NAME="mistralai/Mistral-7B-Instruct-v0.2"

DEFAULT_MAX_CONCURRENCY = 300
You can also set more of your default config values here. In ideal cases, we typically fetch most configurations from environment variables, however, if some variables are missing then we can replace null with these default config values.
Define Inference engine using HuggingFace
Within src/engine.py file, we define our logic on doing inference using huggingface transformers. We start by importing all the required modules and dependencies:
import os
import logging
import asyncio
from dotenv import load_dotenv
from typing import List, Dict, Any, Union
from threading import Thread
from queue import Empty
from transformers import (
    AutoModelForCausalLM,
    AutoTokenizer,
    TextIteratorStreamer,
)
from constants import DEFAULT_DEVICE, DEFAULT_MODEL_DIR
For our inference engine, we start by initializing our HuggingFace Model, tokenizer and streamer. The streamer from TextIteratorStreamer helps us to stream token from our chat based response. Here is how we define that:
class HFEngine:
    def __init__(self) -> None:
        load_dotenv()
        self.model, self.tokenizer, self.streamer = self._initialize_llm(
            model_name_or_path=os.environ.get("MODEL_DIR", DEFAULT_MODEL_DIR),
            tokenizer_name_or_path=os.environ.get("MODEL_DIR", DEFAULT_MODEL_DIR),
            device=os.environ.get("DEVICE") or DEFAULT_DEVICE,
        )
        self.device = os.environ.get("DEVICE") or DEFAULT_DEVICE

    def _initialize_llm(
        self, model_name_or_path: str, tokenizer_name_or_path: str, device: str
    ):
        # Initialize your model and tokenizer here
        try:
            self.model = AutoModelForCausalLM.from_pretrained(
                model_name_or_path,
            ).to(device)

            self.tokenizer = AutoTokenizer.from_pretrained(
                tokenizer_name_or_path,
            )

            self.streamer = TextIteratorStreamer(self.tokenizer)
        except Exception as error:
            logging.error("Error initializing HuggingFace engine: %s", error)
            raise error

        return self.model, self.tokenizer, self.streamer
After this, we write a simple async function which takes user's input and streams tokens iteratively. Here is how we are going to define that:
class HFEngine:
    def __init__(self) -> None:
        load_dotenv()
        self.model, self.tokenizer, self.streamer = self._initialize_llm(...)

    def _initialize_llm(self, model_name_or_path: str, tokenizer_name_or_path: str, device: str):
        # initialized your llm
        ...

    async def stream(
        self,
        chat_input: Union[str, List[Dict[str, str]]],
        generation_parameters: Dict[str, Any],
    ):
        try:
            async for output in self._stream(
                chat_input=chat_input,
                generation_parameters=generation_parameters,
            ):
                yield output
        except Exception as e:
            yield {"error": str(e)}

    async def _stream(
        self,
        chat_input: Union[str, List[Dict[str, str]]],
        generation_parameters: Dict[str, Any],
    ):
        # An async function to do streaming
        if isinstance(chat_input, str):
            chat_input = [{"role": "user", "content": chat_input}]

        input_ids = self.tokenizer.apply_chat_template(
            conversation=chat_input, tokenize=True, return_tensors="pt"
        ).to(self.device)

        generation_kwargs = dict(
            input_ids=input_ids, streamer=self.streamer, **generation_parameters
        )
        thread = Thread(target=self.model.generate, kwargs=generation_kwargs)
        thread.start()

        for next_token in self.streamer:
            try:
                if next_token is not None:
                    yield {"status": 200, "delta": next_token}
            except Empty:
await asyncio.sleep(0.001)Now that we have finished defining our constants and our HuggingFace inference engine logic, it's time to define a simpler handler function that utilizes those to start the Runpod server.
It's important to remember that RunPod has limitations when it comes to having endpoints. You can not write or customize your server endpoint. RunPod expects you to define your inference code properly so that it can use it inside the server. We'll learn more about this later.
Writing the handler code
Think of this part as defining your server side code. Here we are going to define a job. A job in RunPod represents an atomic request from the client, similar to a user request. This request typically includes various inputs like the prompt (or message) and additional parameters like temperature, top_p etc. Let's start by outlining a user job input schema:
import runpod
from engine import HFEngine
from constants import DEFAULT_MAX_CONCURRENCY


class JobInput:
    def __init__(self, job):
        self.llm_input = job.get("messages")
        self.stream = job.get("stream", False)
        self.sampling_params = job.get(
            "sampling_params",
            {"temperature": 0.1, "top_p": 0.7, "max_new_tokens": 512},
        )
Now we will be using this to fetch the input from our user, fit that into our model and stream the output. All that is done inside the handler function. A Handler Functions allow you to execute code in response to events without the need to manage server infrastructure. According to RunPod documentation
The Handler Function is responsible for processing submitted inputs and generating the resulting output. When developing your Handler Function, you can do so locally on your PC or remotely on a RunPod GPU instance.
Now let's define our handler function:
async def handler(job):
    engine = HFEngine()
    job_input = JobInput(job["input"])
    async for delta in engine.stream(
        chat_input=job_input.llm_input,
        generation_parameters=job_input.sampling_params,
    ):
        yield delta
And finally we need to start the server with some initial configuration (optional):
runpod.serverless.start(
    {
        "handler": handler,
        "concurrency_modifier": lambda x: DEFAULT_MAX_CONCURRENCY,
    }
)
Congratulations if you've made it this far! Now it's time to do the deployment on RunPod cloud. Fun fact: if you want to check your code logic before packaging and deploying in cloud, you can do that with runpod sdk, with this single command:
python src/handler.py --rp_serve_apiAfter you run this, it will serve the models under localhost and also provides you a nice swagger UI to test your model deployment.
📦 Deployment on RunPod
Now that we've defined our server-side code, including the inference logic, and verified it locally, it's time to deploy it on the RunPod cloud. This process can be broken down into two key steps:
- Writing out Dockerfile, building the docker image and pushing it to docker hub
- Use that docker image to deploy on RunPod cloud.
Writing out Dockerfile, building the docker image and pushing it to docker hub
Now, let's take a look at our Dockerfile. It is super simple, however, you can do as much customisation as you want:
## Start with a base Image. We are using PyTorch v2.2 with Cuda v12.1 runtime
## when you will be using this image, it will contain all the essential cuda builds and dependencies
## so that we do not have to do it from our side.

FROM pytorch/pytorch:2.2.1-cuda12.1-cudnn8-runtime

WORKDIR /

## We define this arguments that can be used during building the model
## if no args are defined then we will be using the default values

ARG MODEL_NAME=mistralai/Mistral-7B-Instruct-v0.2
ARG TOKENIZER_NAME=mistralai/Mistral-7B-Instruct-v0.2
ARG DEVICE=cuda
ARG MODEL_DIR=/model
ARG HF_TOKEN=null

## We set up our env variables using those arguments

ENV MODEL_NAME=${MODEL_NAME}
ENV TOKENIZER_NAME=${TOKENIZER_NAME}
ENV DEVICE=${DEVICE}
ENV MODEL_DIR=/model
ENV HF_TOKEN=${HF_TOKEN}

## Copy the requirements txt file to install the depdendencies
COPY requirements.txt /requirements.txt
COPY scripts/download_hf_model.py /download_hf_model.py

## Now we install the dependencies and download the model to /model folder

RUN python3 -m pip install --upgrade -r /requirements.txt --no-cache-dir && \
    --mount=type=secret,id=HF_TOKEN,required=false \
    if [ -f /run/secrets/HF_TOKEN ]; then \
    export HF_TOKEN=$(cat /run/secrets/HF_TOKEN); \
    fi && \
    if [ -n "$MODEL_NAME" ]; then \
    python3 /download_hf_model.py; \
    fi

## Some times, the download might stuck and if that is happening then you can comment out this RUN command and the run the following command:
## However in the step: COPY ./model /model you are required to copy or download your HuggingFace model
## to ./model folder, other wise it can not access the models and face error. Now you can uncomment this below code and comment out the above one for building your container.

# RUN python3 -m pip install -r /requirements.txt
# COPY ./model /model

## Copy the src files to /src folder and run

COPY src /src
CMD ["python3", "-u", "/src/handler.py"]
As you may have noticed in the download script instructions, there's a possibility of encountering errors or extended waiting times when downloading HuggingFace models. To avoid these situations, do not run the download model script. Instead, download your model on a local folder like ./model and then copy the contents of ./model to /model directory in the Dockerfile.
./model to /model, then ensure to double check using ls -l ./model which will tell you whether your files are actually copied or a symlink has been created. Because sometimes, the later happens and when you build your docker image, none of the files are actually been copied. Another way to recognise this problem is when your docker image build builds faster than expected. Now, we build our docker image using this command:
docker build --platform="linux/amd64" -t mistral_runpod_deployment:0.0.1 .Then, you need to push this image to docker hub. So for that ensure that you are CLI logged or you can do:
docker loginAnd then tag your image with your docker username on it. See this example below:
docker tag mistral_runpod_deployment:0.0.1 anindyadeep/mistral_runpod_deployment:0.0.1Now push this to dockerhub.
docker push anindyadeep/mistral_runpod_deployment:0.0.1Amazing job! We are done writing all our code. It's time to deploy this image inside RunPod cloud.
Deploying our image to Runpod Cloud
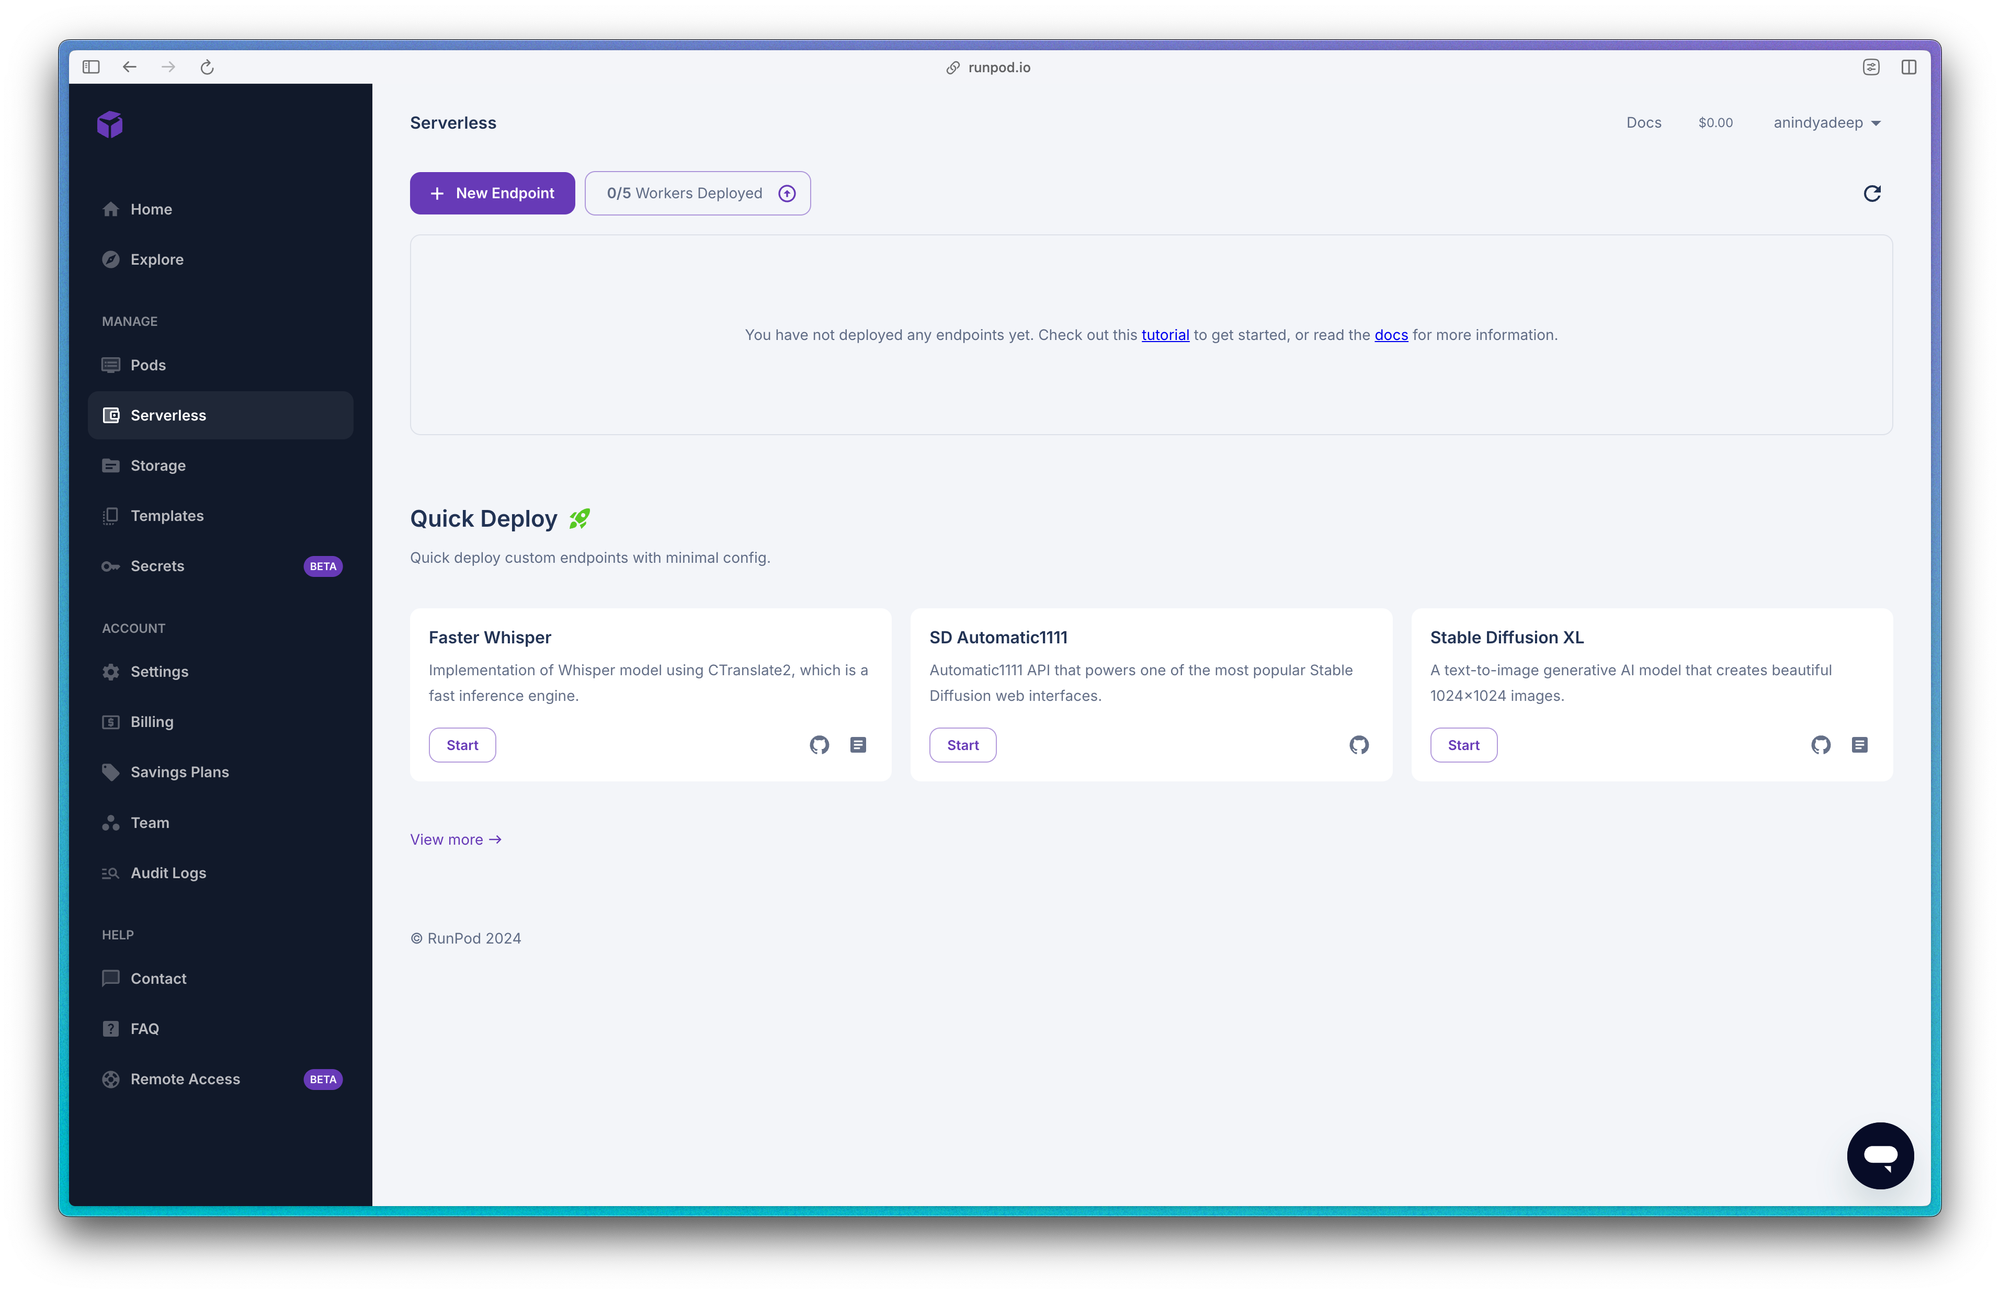
To do this, go inside the serverless option of RunPod Console. If you are a first timer you will see something like this:
Create a new endpoint and do the following steps:
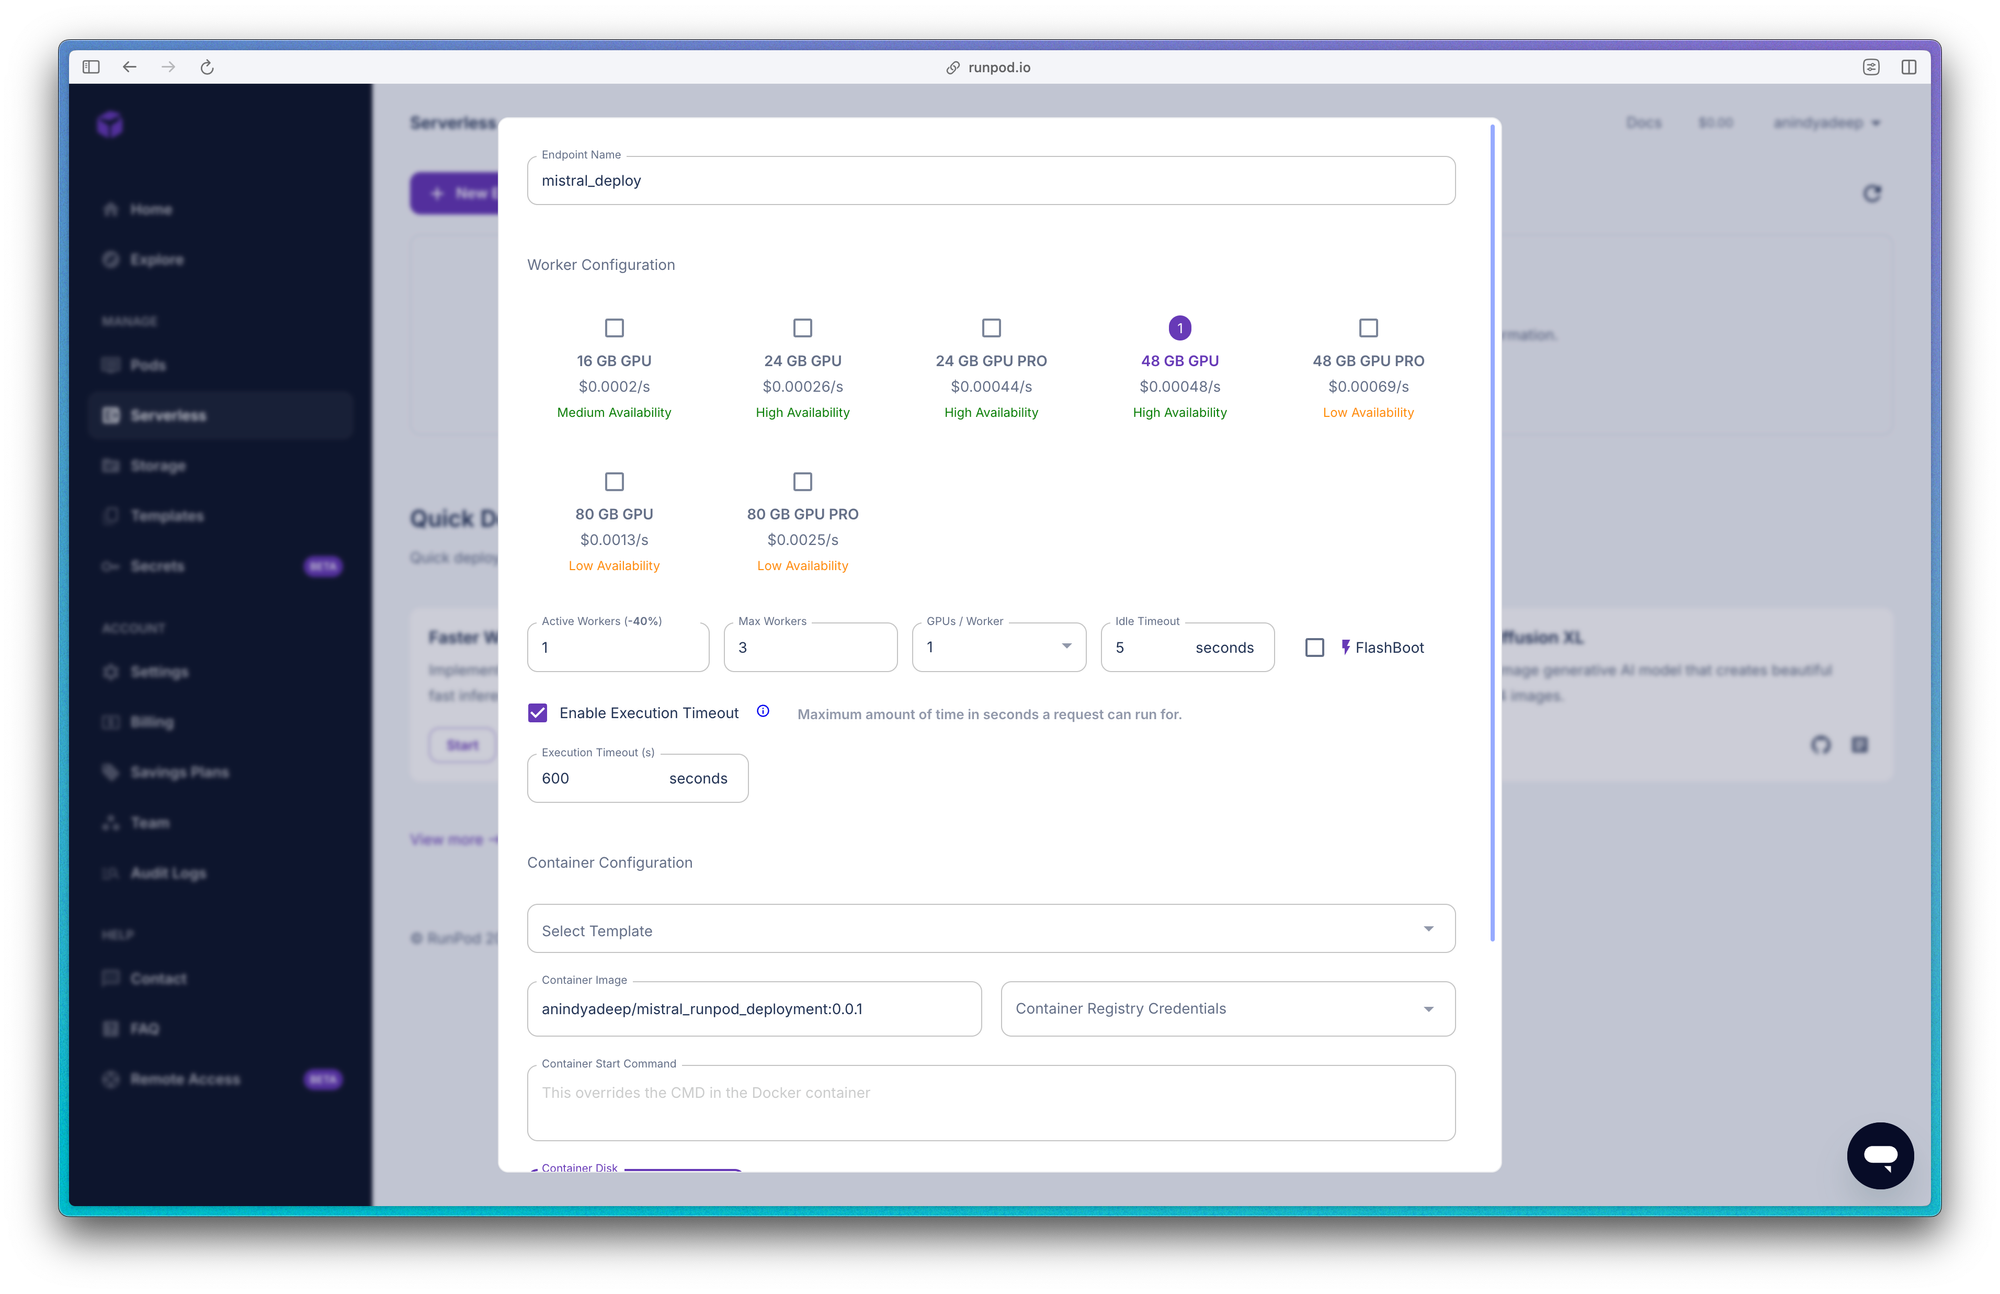
- Name your endpoint. This can be random but we recommend giving it a good name. Example: mistral_deployment
- Select your worker configuration, which will be your GPU Config. Since we are deploying a 7B model, we need good amount of GPUs. You can start out with 48 GB but then based on your requirement move on to 80 GB.
- Define your number of active workers and max workers. Number of workers would define your number of machines at any given time to distribute the load. Greater number of workers would mean higher costs.
- Set your idle timeout and execution timeout. The idle timeout defines the maximum period of inactivity before a worker instance goes into a sleep state. The execution timeout specifies the maximum allowed time for a job to run. If a job exceeds this limit, RunPod cancels it and marks it with a "job cancelled" status.
- Finally give your container image. In our example it would be:
anindyadeep/mistral_runpod_deployment:0.0.1but for your case it needs to be your image name. If your image is private then make sure to give your hub credentials. - Container start command is already defined in our docker file, so no need to do anything on that. By default, container disk size is set to 5 GB, but sometimes it requires more, so configure according to your needs.
After that, hit deploy and you will see a window like this one below. The awesome thing about RunPod's UI is that you can do testing from their UI itself.
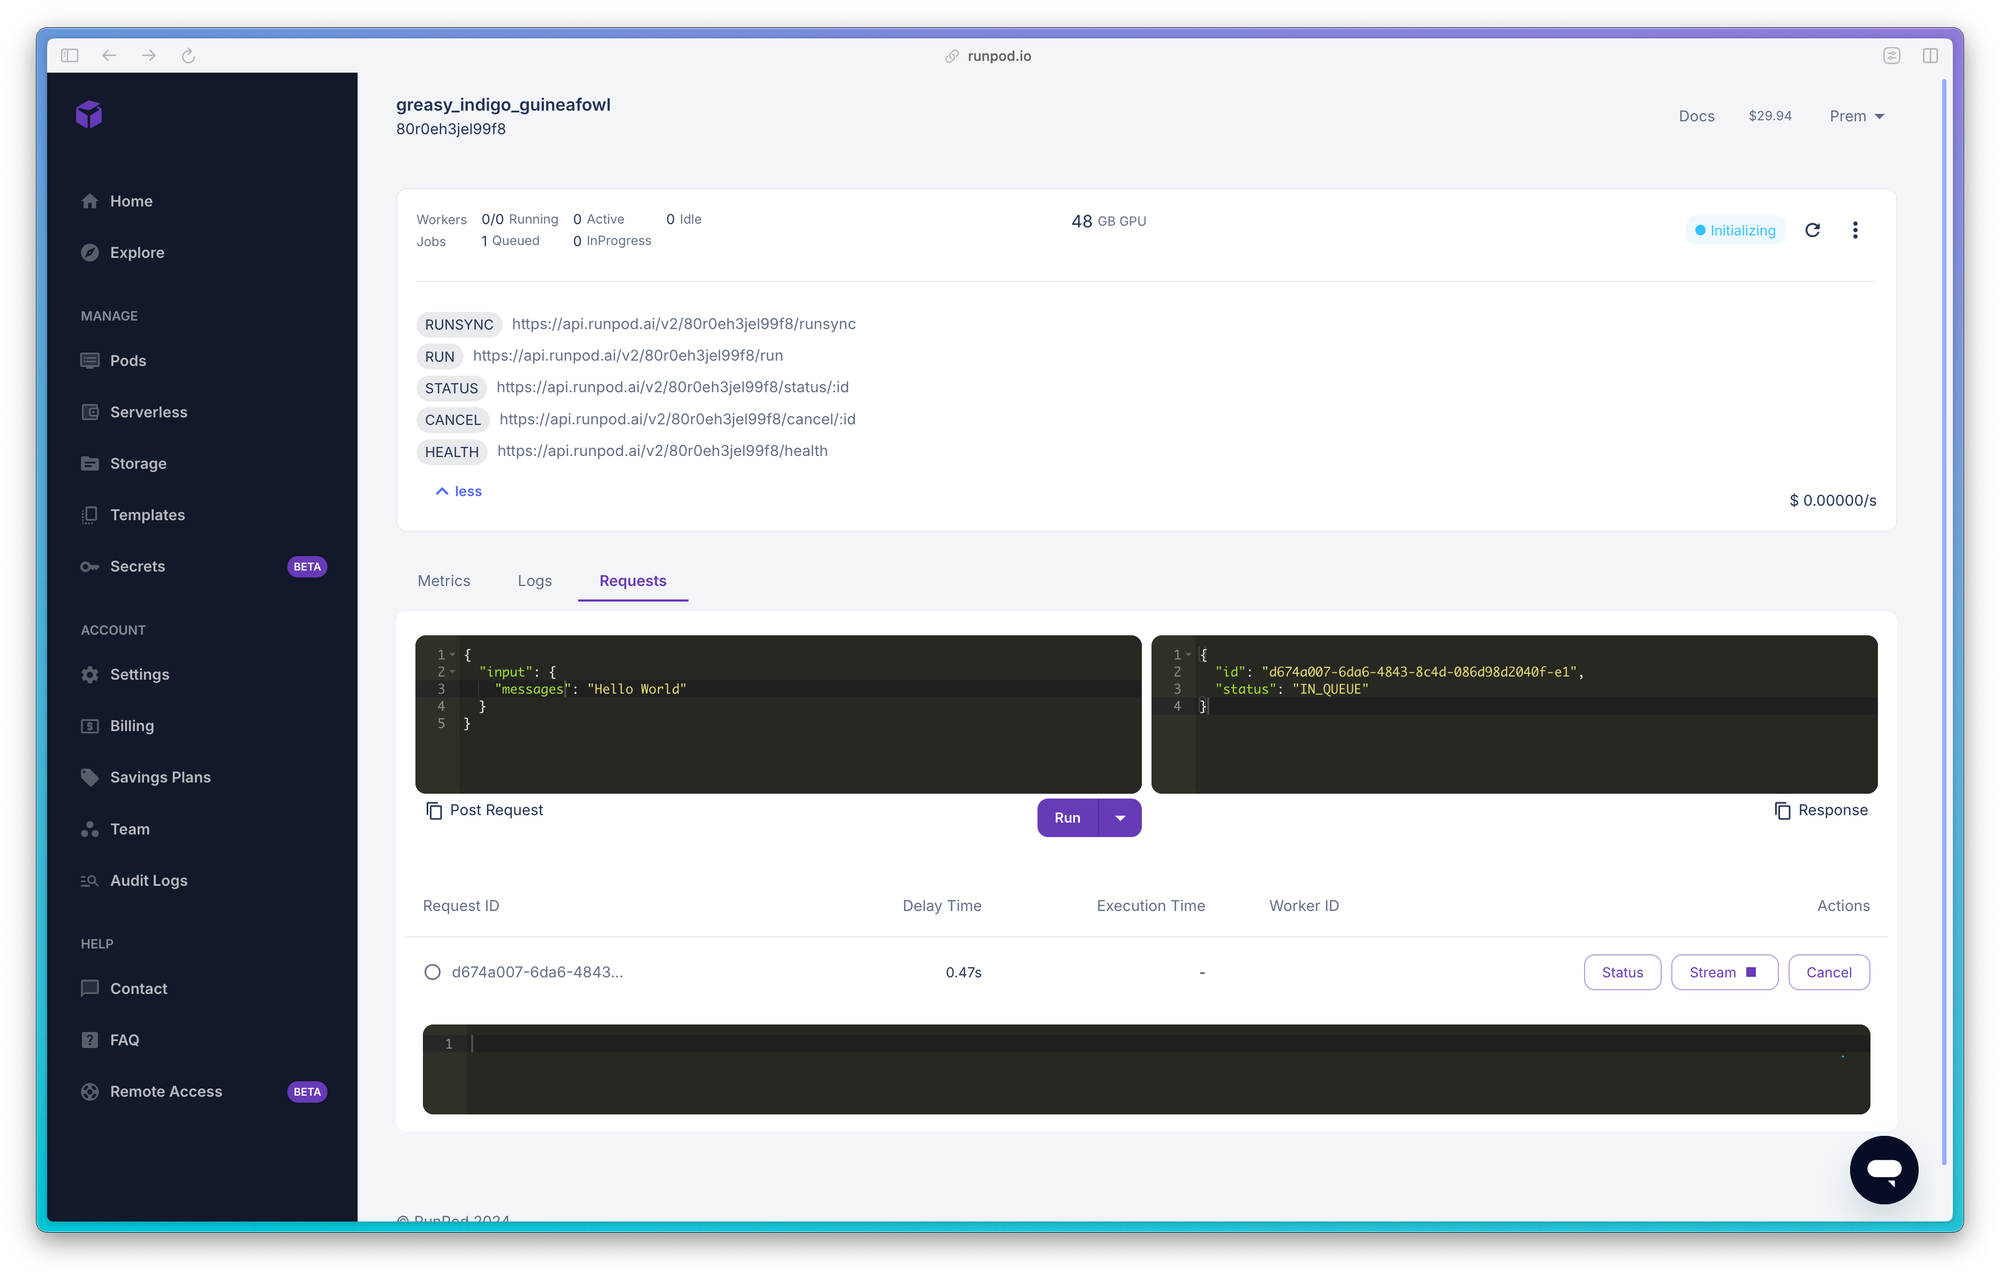
In the last section we are going to see, how to put request and stream response in RunPod. Once you deployed you will see that a service id is there. You can find that written in each of the endpoints defined by RunPod. Like this:
https://api.runpod.ai/v2/80r0eh3jel99f8/runsync

# service id: 80r0eh3jel99f8
🤖 Getting a response from your deployed model
In this final section, we are going to write a simple client-side code on how to put job requests to RunPod and get back and stream results. Make sure you have a RunPod API key. Streaming responses from RunPod is a bit different from standard methods. In short, we hit two different RunPod endpoints here. First, we post a Job request to RunPod using their /runsync endpoint and then we get a JobID. Using this ID we can do two things:
- Get the status of the Job ID, whether it is running (i.e. on Queue or Finished or Cancelled)
- Fetch our response from that job, which can be either a static response or streaming response.
Let's see the example in action:
import os
import requests
from typing import Union, List

def response(chat_query: Union[str, List[str]], service_id: str):
    runpod_api_token = os.environ.get("RUNPOD_API_TOKEN", None)
    headers = {
        "Content-Type": "application/json",
        "Authorization": f"Bearer {runpod_api_token}",
    }

    url = f"https://api.runpod.ai/v2/{service_id}/run"
    data_to_send = {
        "input": {
        "messages": chat_query,
        "stream": True,
        "sampling_params": {
            "temperature": 0.1,
            "top_p": 0.7,
            "max_new_tokens": 512,
        },
        }
    }

    # First post this request and you will get a Job ID in return
    response = requests.post(url=url, headers=headers, json=data_to_send, timeout=600,)

    # Now use this ID to /stream results untill the /status shows COMPLETE
    job_id = response.json()["id"]
    url = f"https://api.runpod.ai/v2/{service_id}/stream/{job_id}"

    while True:
        response = requests.get(url, headers=headers)
        response = response.json()

        if response["status"] == "COMPLETED":
            break
        print(response["stream"][0]["output"])
    return
Now let's use this to call our API. Here is how we can do it:
if __name__ == "__main__":
    chat_input = [
        {"role": "user", "content": "be helpful"},
        {
            "role": "assistant",
            "content": "I'm doing great. How can I help you today?",
        },
        {
            "role": "user",
            "content": "I'd like to show off how chat templating works!",
        },
    ]

    response(chat_query=chat_input, service_id="gx0098lddlsp1c")
Remember to use the service ID obtained when you deployed your model on RunPod Cloud, and you can either put a string in the chat_input or just a string. RunPod will then stream the response, allowing you to customize the output format based on your needs.
🌀 Conclusion
Hopefully, this blog post has equipped you with the knowledge to deploy your favorite LLMs, audio, or diffusion models serverlessly using RunPod. While RunPod offers a high degree of customization for model inference, the developer experience could benefit from some improvement. This translates to fewer readily available resources compared to other platforms. There are numerous RunPod examples for vLLMs and diffusion models, but customizable/hackable implementations specifically for LLMs are currently less prevalent.
Although RunPod grants flexibility in customizing model inference, the core server-side code structure is fixed. This shouldn't be a significant limitation for most use cases.